| CMGG entry for syllabogram to
|
|
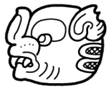
Variant: flame
MC K&H JM TOK.p32.r3.c1 MHD.ZBC.1&3 0044bv
MC MC MC K&H T44abcdef
JM MHD.ZBC.2&4 0044bt 0044do 0044dt T49
TOK.p13.r4.c4 0044bb
MHD.AB4 0044hp
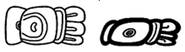
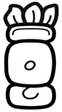
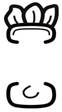
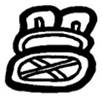
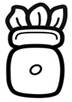
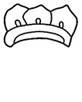
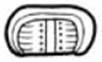
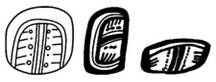
· Subvariants (4): o A. Full – a vertically bipartite glyph: § Top (“crest”) – two or three feelers with protectors: · The feelers can be: o All left feelers, when there are two or three. This is the most common / canonical form: MC, K&H, JM, TOK.p32.r3.c1, MHD.ZBC.1, 0044bv, etc). o A left and a right feeler, when there are two (one of the reduced MC examples). o A left and a right feeler with a middle, non-curved “feeler”, when there are three (one of the reduced MC examples). · Each feeler has its own circle of tiny dots as protector, but in addition there can be an optional additional single-line protector over the tiny-dot protectors (one of the reduced MC’s), or even over each individual tiny-dot protector (the other reduced MC). · The feelers can be reduced to just inverted u’s (MHD.ZBC.3&4, JM). § Bottom (“boulder”): · Bold left wall, ceiling, and right wall (= “symmetric cave”). Occasionally, the bolding can be only in the ceiling (JM, TOK.p32.r3.c1, MHD.ZBC.3, 0044bv). · In the middle of the boulder: o 2 vertical bars from ceiling to floor. o Crossed bands or JAL-like weaving, between the 2 vertical bars. (The JAL-like weaving might just be an illusion caused by one of the crossed bands having a reinforcement.) · On both sides of the middle, symmetrically: o Many parallel horizontal ticks, each tick ending in a tiny dot. o This resembles the two combs of the double comb variant of sa, the difference being that: § In sa the tips of the combs don’t touch at the top (blocked by the two vertical bands), whereas in to, the top is a continuous bold ceiling. § In sa the tips of the combs don’t touch at the bottom (blocked by the two vertical bands), whereas in to the question of their touching or not touching doesn’t arise, because the bolding of the two sides ends when the sides reach the bottom (i.e., the floor is non-bold). o B. Reduced to crest: § Just the “crest” of the full form. o C. Reduced to boulder: § Just the “boulder” of the full form. § This subvariant is given only by TOK and Bonn. § In the two given examples, the bolding is only in the ceiling, not in the walls (also known, but not common, in the full form). o D. Waterlily serpent: § The waterlily serpent with the full subvariant on top. § The full subvariant is neither totally infixed in the top of the head, nor is it above the head. Instead, it covered the top of the head of the waterlily serpent and extends above it. § This subvariant is given only by MHD and Bonn. · Tokovinine explains in one of his lectures (lost reference) that the “protected feeler” elements at the top are related to flames and that the full variant of to is closely related (iconographically speaking) to the full variant of K’AHK’ – i.e., the boulder-shaped element below the “protected feelers” / flames in both cases are a “container” from which the flames emerge. · Do not confuse the “boulder-only” reduced variant of to with the visually similar “boulder” variant of tz’i: o to has crossed bands in the middle. o tz’i has no crossed bands in the middle. · Do not confuse the “boulder-only” reduced variant of to with the visually slightly similar “two-comb” variant of sa: o to has crossed bands in the middle, and the column bands do not reach all the way to the top (i.e., the bold ceiling continues through the whole of the top). o sa never has crossed bands and has a break in the bold ceiling caused by the double vertical bars.
|